No matching section
Try a shorter term such as card, stock, printer or Back Office.
01
Screen overview
Megal EPOS uses one landscape 16 x 10 logical layout on Windows and Android. Every updated till uses the same button positions at every physical screen size; the display scales or scrolls the shared layout where necessary.
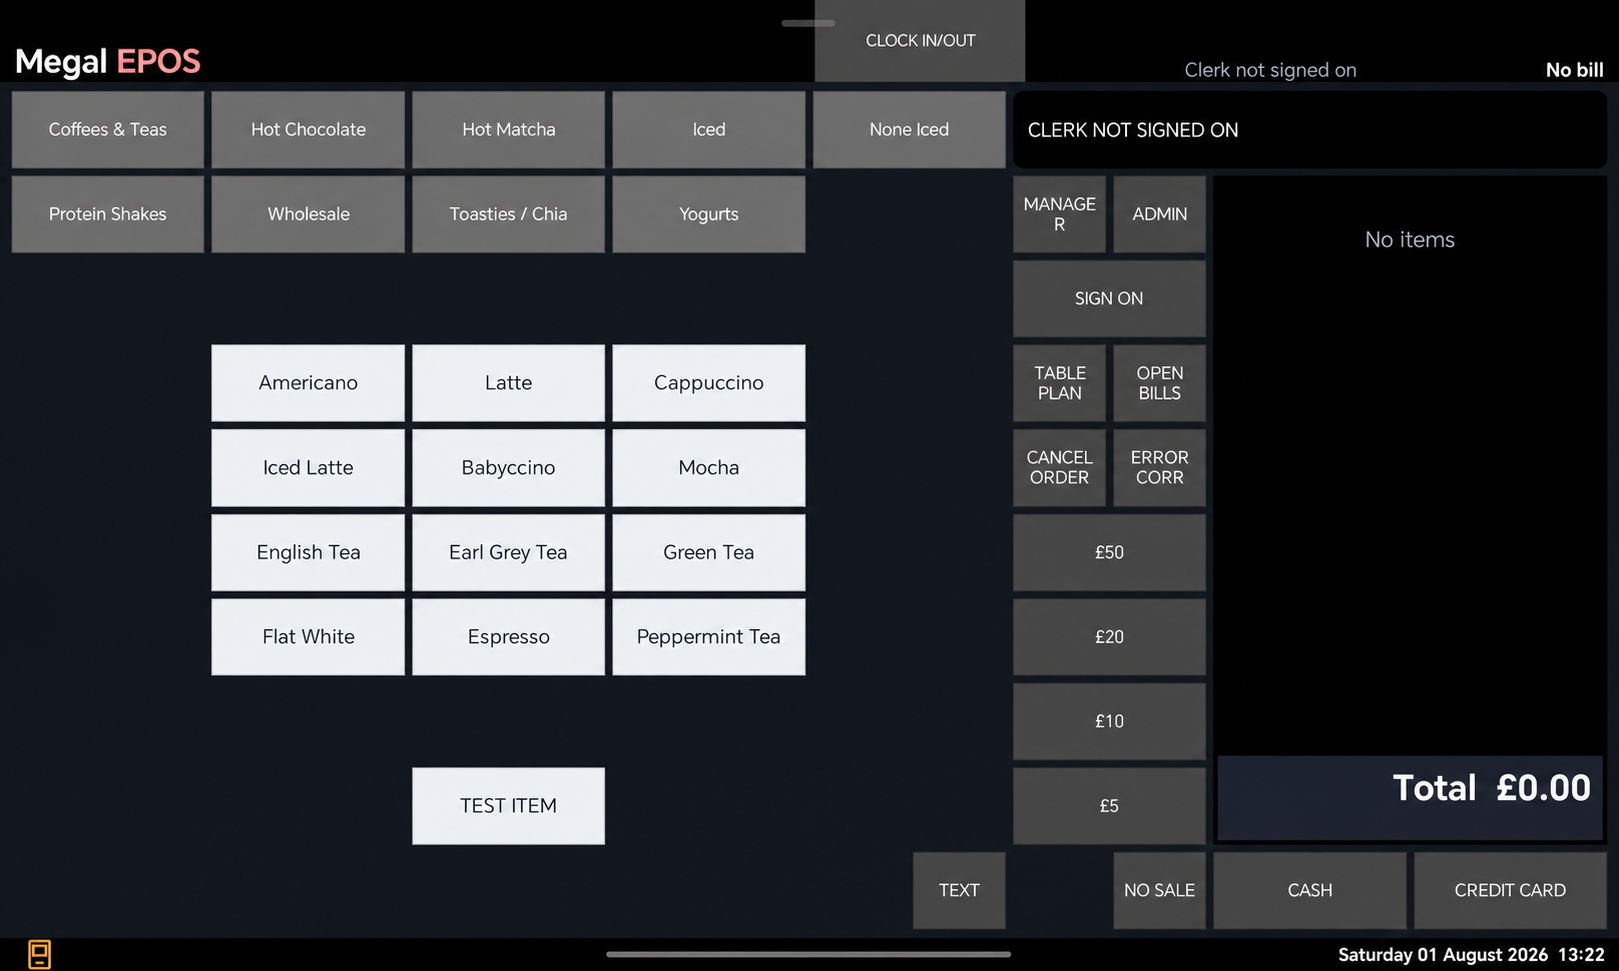
Android and Windows both use the same 16 column by 10 row grid on every screen size. The register is a fixed 4 columns by 8 rows. Its cells remain reserved for the bill and totals; payment and function buttons stay outside it.
02
First run and licensing
Every till requires its own device-bound licence. Use the business owner's billing email on every till owned by that business. Back Office can then assign individual tills to separate operational locations without changing the licensing email.
- Open the Licensing screen. It appears automatically when the till has no usable licence. An administrator can also open Admin > Licensing.
- Enter the customer email. Use the same address on every till that should appear in the same Back Office.
- View the agreement. Read the Licensing and Usage Agreement, then record acceptance online.
- Choose the licence route. Start the one-time 14-day trial, or open License Checkout to register the till and approve its recurring PayPal subscription on the website.
- Wait for confirmation. The till must report an active trial, paid subscription, VIP licence or valid grace period before normal use.
Once the trial has been used, its button is permanently removed. Once a paid or VIP licence is active, activation and subscription buttons are hidden and only the agreement viewer and licence information remain.
Install or update Android
Download the current signed Android APK. For an update, install it over the existing Megal EPOS app. Do not uninstall the app, clear its storage or reset the tablet first, because those actions remove local till databases. A normal signed upgrade retains products, layouts, printers, licensing and sales data.
From Android 1.53, the website edition checks for a newer signed release at startup and every six hours. When an update is available, press Upgrade to download and verify it, or Later to be reminded after six hours. The update cannot start during an order, payment, refund, cash tender, cash count or Z read. Android may request one-time permission to allow Megal EPOS as an installation source, followed by the normal Android update confirmation.
Before replacing or resetting a device, let it finish syncing and use Back Office Settings > Pull From Till, then Save Changes, to preserve its latest configuration. Back Office configuration can be sent to a replacement till, but it is not a replacement for statutory sales-record backups.
The till checks at startup and periodically while running. Outside a valid licence or grace period, operation is blocked and the licence issue cannot be bypassed.
03
Sign on and permissions
The till opens to the sales screen and does not force a clerk selection immediately. A clerk must sign on before protected actions or sales can be completed.
- Press Sign On.
- Enter the clerk login code on the centred keypad.
- Press Enter. The clerk name appears in the top bar.
- Press the same control again to sign off when the till is no longer attended.
Standard, Manager and Admin user types control menu access. Individual permissions can also allow refunds, X reads, Y reads and No Sale. The till records the signed-on clerk against each completed transaction and sends that name to Back Office.
Each staff record has a Compulsory clock in Yes/No setting. When it is Yes, that user must have an open attendance shift in the till's current group before they can sign on or continue using sales functions. It defaults to No for existing users.
When Sign off after order is enabled, the completed order remains visible with Paid and any Change at the bottom of the total area. The till does not immediately open another sign-on window. The next protected action prompts for a clerk, and a successful sign-on clears the previous completed-order display.
04
Clock in and out
Clocking in is separate from signing on to operate the till.
- Press Clock In/Out in the permanent control strip.
- Enter the staff login code.
- Press Enter. If the staff member has no open attendance entry, the till clocks them in; otherwise it clocks them out.
Attendance entries are uploaded to Back Office. Matching entries from more than one till are consolidated so the same shift is not counted twice.
Clock In/Out remains available when daily cash reconciliation is enabled and the till is closed. Staff do not need to open the trading session or sign on as the active sales clerk before recording attendance.
Managers can open Clocked In Users to see the open shifts known across tills in the same Till Group Number and, after confirmation, force an individual shift to clock off. The closure is synchronized to the other tills and Back Office.
05
Start and build a sale
- Sign on. The top bar must show the clerk who is operating the till.
- Select a menu page. Page buttons change the products shown without adding an item.
- Press a PLU. The item is added to the register. Assigned Option Menus run in order, followed by the optional Addons list when enabled.
- Review the register. It automatically scrolls to the newest line. Tap a line to select it for correction or an item discount.
- Take payment. Use Cash, a quick cash button or Credit Card.
| Control | Use |
|---|---|
| Error Correct | Remove the selected PLU, Addon or Option Item before payment. |
| Cancel Order | Cancel the current unfinished order after confirmation. |
| Price Query | Temporarily display an item and its configured price without adding it to the sale. |
| PLU Lookup | Find and select an item from the product list. |
| Program PLU | Open the product editor for authorised maintenance. |
| Misc Item | A user-named open-price PLU. Every press asks for its selling price before adding it to the order. |
A Misc Item retains its configured name and the price entered for that particular sale. Both appear on the current register, the customer receipt, Print Previous Receipt output, refunds, till sales records, Back Office sales records and report exports.
06
Bills, tables and order locations
New Bill starts a separate open transaction. Open Bills lists held bills so a clerk can resume one. Complete or cancel the current work before opening an unrelated bill.
Table Plan assigns a bill to an active restaurant table. Tables have a name, area, seat count, order and active state. If order locations are enabled in Preferences, the customer's service location, such as Eat In, Outside or Take Away, is selected and retained with the sale. This is separate from the till's site or branch.
Store Table asks for an available table and the customer's name, stores the open order against that table, and removes it from the current clerk. Reopen it from Table Plan; the clerk who reopens it then owns the bill while serving it. The table and customer name remain attached to the bill, so pressing Store Table again returns it directly to the same table without asking for either detail again.
Every open bill must be completed or cancelled. Megal EPOS will refuse to close the period while open bills remain.
07
Register controls
The black register shows item quantities, PLU names, Addons, Option Items, kitchen messages, discounts and values. The total is right aligned. If VAT is disabled or its rate is zero, VAT and subtotal lines are hidden and the total panel contracts to the required height.
The register automatically scrolls to its newest item. Paid is hidden until money has actually been tendered. After completion, the totals area keeps Total, Paid and any Change on separate readable rows until the next clerk signs on or begins another action.
| Control group | Purpose |
|---|---|
| Numeric keypad | Enter quantities and prompted amounts. |
| Quick cash | Complete a cash sale with a fixed tender such as GBP 5, GBP 10, GBP 20 or GBP 50. |
| Permanent strip | Clock In/Out, 10%, 20%, 25%, 50%, Subtotal and Text. |
| Enter Cash | A centred payment keypad opened by Cash; it does not cover or replace the saved till layout. |
08
Addons and option menus during a sale
A PLU can have ordered Option Menus and directly assigned Addons. After the PLU is added, each active Option Menu opens in its assigned order. Choose one Option Item to add it and advance to the next menu. The cross closes the sequence without adding another choice.
After the last Option Menu, the assigned Addons list opens when Modifier menu is set to Yes in Preferences. Select optional extras and use the top-right cross to close it. When Modifier window persists is enabled, the Addons list stays open for further selections; otherwise it closes after one addon. Turning Modifier menu off skips this automatic Addons popup but does not disable ordered Option Menus.
Addons can also be assigned directly to normal screen buttons in the Back Office layout editor. Select the parent item in the register before pressing a direct Addon button. Each Addon or Option Item appears beneath its parent PLU and its price change is included in the line total.
To remove an Addon or Option Item before payment, select its register line and press Error Correct. Stock changes only when that record has Deduct stock enabled.
09
Subtotals and discounts
The permanent discount buttons apply 10%, 20%, 25% or 50%. Each PLU, Addon and Option Item has its own Allow discount setting. Components set to No are excluded while eligible components in the same item or bill are still discounted.
Discount one item
- Tap the item in the register.
- Press the required percentage.
- Check the discount line and revised total.
Discount the whole bill
- Add all items.
- Press Subtotal.
- Press the required percentage.
If no item is selected and Subtotal has not armed a bill discount, the till asks you to choose one of those two routes. If the selected item or bill has no discount-eligible value, Megal EPOS leaves its total unchanged and reports that no discount can be applied.
10
Cash payment and No Sale
Cash
- Check the total and press Cash. The centred Enter Cash keypad contains 0, 00, decimal point, Clear, Back, Cancel and Enter.
- Type the amount tendered and press Enter. To take the exact amount without typing, press Enter once to place the amount due in the black display, then press Enter a second time to confirm it.
- The till records the sale, opens the enabled drawer, prints configured receipts and shows Paid plus any Change at the bottom of the totals box. A fixed quick-cash button completes the same process using its stated tender value.
No Sale
Press No Sale to open the drawer without completing a transaction. The signed-on clerk must have No Sale permission. No Sale remains available while a reconciliation-controlled till is closed, because it does not start a trading transaction.
When Cash Drawer Enabled is on in Receipt Settings, the till sends the drawer pulse after Cash and No Sale. It is enabled by default.
11
SumUp card payments
Android can use the SumUp Android SDK with a supported reader or the SumUp Cloud API with a paired Solo. Compatible updated Windows tills support SumUp Cloud sales with a paired Solo; when Cloud payments are disabled, Windows keeps its existing external-terminal card workflow. SumUp Cloud requires internet access.
- On Android, confirm the reader icon in the bottom-left status bar shows the connected state. On Windows, use Admin > Card Payments > Check Reader Status.
- Add the order and verify the amount.
- Press Credit Card. Megal EPOS sends the amount to SumUp.
- Let the customer complete or cancel the reader prompt.
- Megal EPOS returns to the till, verifies the result and only finalises a confirmed payment.
Successful integrated card sales store the SumUp transaction and payment references against the order. Android uses those references to find and refund the original payment. Windows SumUp Cloud currently supports sales only, so Windows card refunds remain an external/manual terminal workflow.
Do not take a second or alternative payment if the app, reader or internet connection was interrupted. On Android, use Check Pending Payment. On Windows, leave the bill open and press Card again after connectivity returns so Megal EPOS can recover and verify the saved checkout.
12
Hosted online ordering
Megal EPOS hosts the menu and checkout. Each business location has its own generated public link and its own ordering configuration. Add the correct location's link to an Order Online button on the relevant website; no website-side installation or credentials are needed.
- In Back Office > Settings, choose the outlet base currency (GBP, USD or EUR). Then under Till Data > PLUs, set Available online to Yes only for products that should appear. New PLUs default to No. Misc Item PLUs are never published, and a product that deducts stock and forbids negative stock stays off the hosted menu until central stock reservations are supported.
- Open Online Ordering. Enter the business name and timezone, then enable collection, delivery or both. If delivery has a fee, select the VAT rate included in that fee.
- Add one or more ordering periods for each trading day. Customers may browse while closed, but checkout is accepted only inside a saved period.
- Select the tills that may receive web orders and, if required, choose a preferred till. The preferred eligible till is tried first; other selected tills provide failover.
- Enable daily reconciliation on each receiving till and use Open Till at the start of trading. At least one selected till must report online-order support, an open reconciliation session and a current heartbeat.
- Save the channel, copy Hosted ordering page or Button HTML, and add it to the business website. Open the generated page in a new tab for provider-hosted payment authentication.
Locations do not share an ordering channel. Menu availability, trading hours, collection and delivery choices, delivery fees, payment-provider accounts, customer memberships, orders, and receiving tills are all saved against the selected location. Switching location in Back Office therefore opens that location's ordering setup; it does not alter another branch.
| Checkout choice | What happens |
|---|---|
| Cash on collection | The order reaches the assigned till with payment due when the customer collects it. |
| Cash on delivery | The order reaches the assigned till with payment due on delivery. |
| SumUp online | When an enabled SumUp account and payment-reconciliation worker are configured, the customer completes provider-hosted card checkout. Megal EPOS does not receive card numbers. |
Dojo and Barclays hosted payments are planned but are not currently offered by the hosted page. Cash choices remain available when their matching collection or delivery method is enabled.
Checkout requires the customer's name, email, phone number and address. Transactional email is used for essential order, payment and fulfilment messages. When marketing collection is enabled, separate optional boxes ask for outlet promotions and Megal EPOS promotions; neither box is required to place an order. The footer shows Powered by Megal EPOS, Privacy and Email preferences.
The hosted menu, basket, checkout and payment request use the outlet's saved base currency. An online card provider must be configured for that same ISO currency; Megal EPOS rejects a mismatched amount or currency rather than accepting an incorrectly denominated payment.
Each accepted order is server-priced from the latest eligible till menu, assigned once to one till and given an external order number. It appears in the till's stored/open-order list and prints through that till's configured receipt and kitchen routes. Imported lines and totals are locked so a provider-paid order cannot be changed locally without the Back Office record.
Back Office stores one shared customer identity with a separate membership for each outlet. A Back Office user sees only customer details and order history for locations assigned to that login. An order from one location is never exposed through another location. Remove Outlet Membership removes access and outlet marketing consent there; it does not delete the shared identity or retained order records.
A till that does not advertise online-order capability is labelled Till software update required and is never selected as a receiver. It continues normal local sales and compatible Back Office sync without receiving an unfamiliar order payload.
13
Refund a cash or card sale
Refunds begin from the original completed transaction and return money through its original payment method. You can refund the full sale or selected item quantities and amounts. The item list scrolls when a sale contains many items.
- Sign on as a manager or a clerk with refund permission.
- Open Manager > Refund.
- Choose whether the original payment was Cash or Card.
- Select the original transaction, identified by date, time, sale or bill number and remaining refundable amount. Only refundable sales completed on the till's current local calendar day are listed or searchable; a sale from an earlier day cannot be refunded. For cash, search by sale or receipt number. For card, you can also search by the SumUp transaction or payment reference.
- Use plus and minus to choose each item quantity, or press Full Refund.
- For a partial item refund, choose Edit amount and enter a value up to the paid value of that selected quantity.
- For each selected item choose Not returned, Item returned or Item in waste. Not returned is the default.
- Select the refund reason, review the original transaction and total, then confirm.
| Stock choice | Effect when the PLU is stock controlled |
|---|---|
| Not returned | No stock quantity is changed. |
| Item returned | The returned quantity is placed back into stock. |
| Item in waste | The refund is recorded with the item marked as waste. |
If stock control is disabled on the PLU, Megal EPOS still records the refund reason, amount and disposition, but it does not alter stock.
A cash refund is recorded as a negative cash tender, opens the enabled cash drawer, prints a refund receipt and reduces the cash totals in reconciliation, X reads and Z reads. On Android, an integrated SumUp card refund is sent back to the original payment before Megal EPOS records it as successful. Windows SumUp Cloud currently supports sales only; process a Windows card refund through the existing external/manual terminal workflow.
A failed SumUp refund is not recorded as successful locally. A 409 insufficient-balance response means the SumUp account does not currently have enough available balance; resolve that in SumUp before retrying. Never repeatedly retry an uncertain refund without checking the SumUp transaction first.
14
Order and receipt printing
After a completed sale, Megal EPOS prints to the configured receipt printer and sends the order to active kitchen printers. Kitchen output uses double-width, double-height text for visibility and includes the customer's order location, such as Eat In, Outside or Take Away, when one was selected.
Press Text before payment to add a free-text kitchen message such as preparation or allergy information. The message appears in the register and is printed with the order.
Receipts can include header and footer text, logos, item and discount detail, VAT where enabled, tender information, sale/order identifiers and both SumUp references for card payments.
Add the Print Previous Receipt function to a till page when staff need it. It prints the most recently completed retained transaction as a clearly marked duplicate receipt; it does not reprint the kitchen order or create another sale.
16
Preferences
Open Admin > Preferences to set:
| Setting | Purpose |
|---|---|
| Till name | The friendly machine name shown in Back Office instead of the Android or Windows hardware name. |
| Till site / branch | An optional site, bar or branch label used to identify the till in Back Office. It is not the customer's order location. |
| Till group number | Separates local-network peer discovery when more than one independent till group shares the same network. It defaults to 1; only tills with the same licensed site identity and group number recognise one another. |
| Daily Back Office poll | 24-hour time used for the daily acknowledged upload-queue archive. |
| Currency | The outlet's base currency: British Pounds (GBP), US Dollars (USD) or Euros (EUR). It controls till, receipt, report, hosted-ordering and payment amounts. |
| Clerk idle logout | Number of inactive seconds before the current clerk is signed off. Every screen touch or key press restarts the timer. The default is 30; set zero to disable it. |
| Sign off after order | Signs the clerk off after an order is completed or stored, requiring a login for the next order. Enabled by default. |
| Modifier menu | Choose Yes to show directly assigned Addons automatically after a PLU's Option Menus, or No to skip that Addons popup. Ordered Option Menus still appear. |
| Modifier window persists | Keeps the automatic Addons list open until the clerk presses the cross. |
| Daily reconciliation | Requires a counted opening float, recorded cash in/out movements and a counted closing Z. Leave off to retain the standard Z Read workflow. |
| VAT rate / Charge VAT | Controls VAT calculation and whether VAT/subtotal lines appear. |
| Next sale number | Sets the next sequential till sale number. |
| Allow negative stock | Permits sales below the recorded stock quantity where product settings allow it. |
| Kiosk mode | Enables the current restricted-mode groundwork. The customer-facing self-service kiosk, product images and kiosk template workflow are still in development. |
| Order locations enabled | Requires the customer service location to be selected before payment and includes it in order-location reporting. |
| Reset Sales Data | Permanently clears transactional data held locally on this till after an HMRC warning and typed confirmation. |
Complete or cancel every open or stored order first. Read the irreversible-deletion and HMRC record-retention warning, then type RESET SALES exactly to confirm.
The reset removes local bills, sales, receipt and refund records, payment provider records and Z reads, and restarts the visible sale and bill numbers at 1. It does not delete Back Office data, alter products, layouts, stock levels, printers, licensing or other settings, and it does not refund payments with a payment provider. Complete any required provider refunds before resetting.
Saving the till name or site / branch updates the till identity sent to Back Office on the next sync.
Back Office treats till name, site / branch and Till Group Number as per-till identity. A routine settings deployment leaves them unchanged; tick Also copy the till name, site / branch and till group number only when the destinations should deliberately receive the source identity values.
If the idle timer or a manual sign-off finds an open order, the till stores it against that clerk and queues it for the Back Office. Signing on with the same clerk number on another licensed till reopens the order. If the internet is unavailable, the local copy remains safe and the handoff is retried.
17
Clerks and permissions
Open Admin > Edit Clerks to add or edit a user number, login code, display name, type and active state. Grant only the permissions needed for the role:
- Admin has administrative access and can manage configuration.
- Manager has Manager and Admin Menu access without being the required configuration administrator. Back Office preserves this type on existing users; its new-user selector offers Admin, Standard and Trainee.
- Standard is the normal trading role.
- Trainee can practise entering and tendering orders, but practice sales are discarded and are never included in sales, stock, receipts, kitchen tickets, uploads or reports. Training mode does not open the cash drawer.
- Refunds permits entry to the refund workflow.
- X Read permits a current-period read without closing it.
- Y Read permits the corresponding intermediate read where available.
- No Sale permits opening the cash drawer without a sale.
- Compulsory clock in requires that user to clock in before signing on or using the till. It is off by default so existing staff behavior is unchanged.
A remotely edited configuration must contain at least one active Admin user. Back Office rejects a configuration that would remove all administrators.
18
PLUs, addons, option items and menu levels
Menu levels, groups and departments
Menu levels define product pages. Set a page code, title, sort order and default page. Groups organise PLUs and can provide default menu and product button colours. Departments are a separate editable reporting dataset: Food and Drink are supplied initially, and further departments can be added, renamed, reordered, or disabled.
PLUs
Open Admin > Edit PLUs. Each PLU can hold an optional group, an optional reporting department, code, name, price, tax rate, button colour, current and minimum stock, stock-control flags, Allow discount, Available online, sort order and active state. It can also hold an ordered list of Option Menus and a tick-list of Addons. Allow discount defaults to Yes; Available online defaults to No. A PLU button continues to work when either classification is unassigned.
Use Option Menus and Addons while editing a PLU to tick the required assignments. Option Menu order controls the sequence shown to the clerk.
The hosted menu includes only active PLUs marked Available online. To prevent an online order that the receiving till would have to reject, a stock-deducting PLU that forbids negative stock is also withheld until central stock reservations are supported.
Misc Item PLUs
Use Create Misc Item when a button needs a user-defined description but no fixed selling price. Give it the exact name required on receipts and sales records. Megal EPOS creates an open-price PLU and its button; its base price is zero, stock deduction is off and Available online is off. Multiple separately named Misc Item buttons may be created. The operator must enter a price every time one is pressed.
Addons
Open Admin > Edit Addons to maintain code, name, price change, tax rate, button colour, current/minimum stock, stock-control flags, Allow discount, sort order and active state. Addons are optional extras assigned directly to a PLU or used as direct layout buttons.
Option Items and Option Menus
Option Items use the same price, tax, stock, discount, colour, order and active fields as Addons, but they are offered as choices inside Option Menus. Open Edit Option Menus, create a code and name, tick the Option Items included in that menu, and set its sort order. Assign one or more Option Menus to a PLU in the order they should appear.
19
Stock control
Stock can be enabled separately on each PLU, Addon and Option Item with Deduct stock. Records without that setting still sell and refund normally but do not change stock quantities.
| Admin function | Use |
|---|---|
| Stock In | Add received quantity to a PLU or modifier, with optional notes. |
| Waste | Record stock removed as waste, with optional notes. |
| Transfer Stock | Move recorded quantity to a configured transfer location. |
| Transfer Locations | Create and maintain the available stock destinations. |
| Current Stock report | Review recorded quantities. |
| Stock Requirements report | Find items at or below their minimum level. |
If negative stock is not allowed, Megal EPOS prevents a stock-controlled sale that would take the item below zero. Global and item-level settings both apply.
20
Till layout editor
Open Admin > Edit Layout. Every Android and Windows till uses the same landscape 16 x 10 logical layout, regardless of its physical screen size or aspect ratio.
- Select the menu page.
- Add a PLU Item Button, Misc Item, Menu Level Button, Cash Register Control Button or Other Function Button.
- Place it on an empty cell in the 16 x 10 grid.
- Edit its caption, action target, row span, column span, colours and visibility.
- Save and return to the till to review the live result.
Buttons may span more than one grid cell. The editor prevents overlapping placements. Cash register and fixed-interface cells remain reserved. A smaller or differently shaped screen scales or scrolls this same layout; it does not select a different template.
Back Office sends the 16 x 10 menu only to Android or Windows clients that report the matching layout format and capability. A legacy till keeps its installed layout while the server delivers the other compatible configuration sections, so updating one till does not overwrite an older till with unfamiliar coordinates.
Use the Back Office Screen Layout editor when assigning a direct Addon button. The Android on-till editor handles PLUs, pages and functions; the remotely saved layout supports Products and Addons.
The Back Office Screen Layout editor can pull the complete 16 x 10 till layout, edit it and send the result to one or more selected tills.
21
Receipt printer and cash drawer
On a compatible updated Android or Windows till, open Admin > Receipt Settings, choose a connection type and enter the matching details. Both platforms include the receipt format, connection fields and dedicated test control; older Windows builds keep their previous printer screen.
| Connection | Configuration |
|---|---|
| USB | Select or enter the USB device, vendor ID and product ID. Windows serial setups can also use port, baud, data bits, parity and stop bits. |
| IP | Enter the printer network address and port, normally 9100. |
| MAC Address | On Android, save the printer MAC and Megal EPOS resolves its current address from the local neighbour table when printing. Windows can save the MAC but also needs the last discovered IP address; it does not yet perform active MAC-to-IP discovery. |
- Set printer name and connection details.
- Add header/footer lines and optional header/footer logo paths.
- Leave Cash Drawer Enabled on when the drawer is connected through the receipt printer.
- Save, then use Admin > Test Receipt Printer on a compatible updated Android or Windows build.
MAC discovery requires the tablet and printer to be on the same reachable local network. Guest Wi-Fi or wireless client isolation can block device-to-device discovery even when both devices have internet access.
22
Kitchen printers
Open Admin > Kitchen Printers. The first screen lists configured printers. Press Add Printer, or select an existing printer to edit it.
- Use a unique printer code beginning with KP.
- Enter a name and optional kitchen/location label.
- Turn the printer active.
- Choose Use Receipt Printer Connection, or configure its own USB, IP or MAC connection.
- Run Print Connection Test and save.
Android MAC mode discovers the current network address at print time. Windows MAC mode uses the stored last discovered IP address. When the kitchen and receipt outputs share one physical printer, Megal EPOS serialises the jobs so they do not attempt to use the connection simultaneously. Use Delete inside an existing printer's settings when it should be removed.
Kitchen tickets include the selected order location and free-text kitchen message. The order location describes where the customer is eating or taking the order, not the till's site or branch.
A dedicated kitchen display system is planned but is not part of the current production till. Use configured ESC/POS kitchen printers for live order output.
23
Card payment settings
Open Admin > Card Payments. Android can use Android SDK for supported local reader integration or Cloud API for a network-connected Solo. Windows can enable SumUp Cloud for Solo sales, or leave it disabled to use the existing external/manual terminal workflow.
The screen stores the credentials and identifiers required by the chosen SumUp integration: Affiliate Key and Application ID for Android SDK where applicable, plus secret API key, Merchant Code, Reader ID, currency, minor unit, payment description, terminal return URL and polling limits for Cloud mode.
| Tool | Use |
|---|---|
| Check Terminal / Reader Status | Read the configured SDK or Cloud reader state. Windows labels this Check Reader Status. |
| Test Refund API | Android only: confirm that the API credentials can reach the refund service. This does not enable Windows automated refunds. |
| Pair Solo Reader / Pair and Save | Enter the pairing code displayed by a Wi-Fi connected Solo. Windows uses Pair and Save. |
| Login to SumUp | Android SDK only: authenticate the local Android integration. |
| Setup / Pair Card Reader | Open SumUp reader selection for SDK-supported models. |
| Prepare Reader | Restore or initialise the selected SDK reader. |
| Check Pending Payment | Resolve a payment whose return to Megal EPOS was interrupted. |
Secret payment API keys provide access to payment operations. Do not place them on receipts, in screenshots or in messages. Hosted-ordering credentials saved in Back Office are encrypted and are never displayed again.
25
Till reports
Open Manager > Reports, select a report and date range where requested, then run the on-screen preview.
Use Current Stock and Stock Requirements for inventory checks; movement reports provide the audit trail for Stock In, Waste and Transfer Stock. Sales and Period Summary cover transaction performance. Time & Attendance lists staff clock records.
26
Licence management
Open Admin > Licensing to view the current state:
- 14-Day Trial shows the trial expiry.
- Paid Subscription shows subscription state, paid period expiry and the next billing date/time supplied by the licensing service.
- VIP shows: "License Has No Expiry, Subject To Megal Software Limited's Discretion."
- Grace shows the reason, start date and expiry date.
After a successful online licence check, paid and VIP tills can continue trading offline for up to 30 days. The till retries its licence and Back Office connections automatically and refreshes the offline deadline only after the licensing service approves it again. Trials and deliberately cancelled subscriptions remain limited by their stated expiry dates.
A failed recurring payment or removal of VIP status begins a separate fixed 30-day grace period. The warning offers Continue while grace remains and Fix Billing for billing issues. The till must reconnect and resolve the licence or billing problem before the applicable deadline expires.
The licence is tied to the device identity. Replacing till hardware may require licence assistance rather than reusing the old machine record.
27
Back Office access and password
Open www.megalepos.com/backoffice. The main business-owner login initially uses the email registered for licensing. Additional Back Office users use the independent login email entered for them by the owner; their email does not become a licensing email.
- Select Set up or reset password.
- Enter the exact email assigned to that Back Office login. For the owner, this is normally the Megal EPOS licensing email.
- Open the secure one-time link sent to that address.
- Create a password of at least 12 characters containing a letter and a number.
- Return to Back Office and sign in.
Use the reset route whenever the password is forgotten. For security, the request screen does not confirm whether an email is registered.
28
Business locations and Back Office users
An existing single-site account starts with one location automatically. The business owner retains all licences and full access to every location. Tills continue to activate with the owner's licensing email even after they are assigned to different locations.
- Open Business Locations to create or rename a location and choose its local timezone. Common UK, Irish, European and US timezones are provided; an existing valid saved timezone is retained.
- Assign each licensed till to its operating location. A move changes where future till sync is delivered; it does not move or combine the old location's historic sales, orders or attendance.
- Use the location chooser before editing tills, menus, hosted ordering, payments, customers or orders. Every change is restricted to that selected location.
- Choose All Locations only on Reports. The overview and every data-changing screen always require one concrete location.
- Before disabling a closed location, move all its tills, switch off hosted ordering, finish pending orders and resolve outstanding payment reviews. At least one location must remain active.
Each location is an independent operational workspace with its own hosted-ordering link, menu, hours, fulfilment settings, payment-provider configuration, online customers, orders and receiving tills. This separation also prevents one location login from viewing another location's orders. Disabling a location never deletes it: historical reports remain available and clearly identify the inactive location.
Additional users and permissions
Open Back Office Users to create optional additional logins. Assign each user to one or more locations, choose View or Edit access independently for each location, and grant only the required functions such as reports, exports, till data, deployments, online ordering, orders, customers or payment settings. Permissions are enforced by the server as well as hidden from the menu.
Leaving a location unassigned makes it visible only to the business owner. An inactive location is shown in user management so the owner explicitly keeps or removes that user's historical-report access; changing the user's email or other permissions does not silently discard it. A user assigned only to inactive locations must have Reports permission and is taken directly to historical reports after sign-in. Disabling or removing an additional user never changes locations, till licences, hosted ordering, history or the owner's email. The original business owner cannot be removed, disabled or demoted, and only that owner receives scheduled PDF reports by email.
29
Back Office overview and sales
The Overview contains four movable panels: Sales Summary, Sales By Hour, Till Status and Recent Sales. Drag by a panel's Move control to reorder the cards; they remain in the non-overlapping dashboard grid.
Use the From, To and Till filters to change the reporting period. Summary values include net sales, transaction count, average sale and refunds. The Recent Sales table shows date/time, till, clerk, sale/order number, payment method, state, item detail and total. Each refund also shows its recorded reason and the linked original order number, bill number, date and time. The full Sales screen uses the same transaction detail.
Refunds and any other negative balances are shown in red in summary cards, charts and transaction detail so they cannot be mistaken for positive takings.
The Sales page expands the same transaction view for the selected period. Open an item's disclosure to inspect its reported lines.
30
Back Office till status
The Tills page lists devices assigned to the selected location, including each friendly name, till site / branch, online/offline state, Android or Windows platform, installed software version, licence state, last sync, latest local sale ID and configuration-deployment state. The business owner manages location assignment separately while retaining every licence under the owner account. The current Android and Windows release numbers are shown at the top for comparison.
Receipt-printer health shows the last reported connection type, endpoint, result, check time and most recent successful contact. Not reported means that till version has not yet sent printer telemetry; it does not by itself prove that printing has failed.
A till is Online only while it is actively checking in; the server marks it Offline after approximately 75 seconds without a heartbeat. A powered-off or disconnected till therefore changes to Offline automatically after the threshold passes.
Set Till name and Till site / branch in each till's Preferences instead of relying on a device model such as an Android hardware name.
31
Back Office reports
- Open Reports.
- Choose the report and select Daily, Weekly, Monthly or Custom dates.
- Select all tills or one till, then press Run Report.
- Press Export CSV to download the report tables in an Excel-compatible file, or Print for a paper or PDF copy.
Sales Summary supplies daily, weekly and monthly totals, daily trends, payment mix and a pie chart showing each item's percentage of sales. Payment Mix and Item Sales Mix use net values after refunds, so refunded payments and items are deducted from the sales figures while remaining visible in the separate refund totals and detail. Both mixes show the net amount in the outlet's recorded currency and its percentage. Negative sales-trend values appear in red beneath their bar. Card Provider Check compares EPOS net card takings with successful provider-confirmed charges less recorded card refunds and highlights any difference. Till & Order Location Performance separates each till's site / branch from the customer's order location and reports Eat In, Outside, Take Away and other configured choices independently. Daily Reconciliation refreshes open sessions from the latest uploaded cash sales, refunds and cash movements, showing the live expected drawer during trading. Counted drawer, variance, next-day float, removed cash and cash added to the float appear once the Z read closes the session.
Bill Audit lists every bill number opened in the selected period and shows whether it completed as a sale, was cancelled, was used for training, remains stored or is still open. Completed entries include their Sale number. The visible Bill number restarts after a Z read and at the first bill of a new day; the till keeps a separate permanent internal key so repeated daily numbers cannot corrupt sales or payments.
Stock Inventory uses the latest configuration snapshot received from each till. Stock Movement and Waste use individual audited stock-in, transfer and waste records. A till must be running a version that supports movement sync before those historical entries appear online.
Every report offers Export CSV. The download uses Excel-compatible UTF-8 CSV and keeps money columns numeric for totals and charts. Users with access to more than one location can run one location or All Locations. Combined output retains a separate location breakdown, applies each site's timezone, and separates totals by currency rather than adding GBP, USD and EUR together.
Time & Attendance always covers every linked till in the selected location rather than the selected sales till. Staff may clock in on one till and out on another at that location; matching and overlapping entries are consolidated before totals are calculated. All Locations reports run the same calculation separately for each authorised location and then show the portfolio breakdown.
32
Pull, edit and send till settings
Daily PDF Report Email is an owner-level setting, enabled by default, that applies across the business. Each location produces its own Daily Sales Summary after that location's scheduled till collection, but every PDF is sent only to the business-owner email; additional Back Office users never receive scheduled PDFs. A location report waits for all tills assigned to that location and uses a 90-minute fallback when one is unavailable. Switch the business-wide setting on or off at the top of Settings and press Save; the latest report date, location and delivery state are shown alongside it.
- Open Settings.
- Choose the source under Pull configuration from, then press Pull From Till.
- Edit General settings, Till Data records, the Screen Layout or the validated Advanced JSON.
- Press Save Changes to keep the full edited configuration in Back Office without sending it to a till. The saved draft loads automatically the next time Settings is opened.
- Tick one or more destination tills. Tick Also copy the till name, site / branch and till group number only when those per-till identities should be overwritten.
- Press Send To Selected Tills.
- Check Deployment History for queued, delivered, applied or failed state and the till's result message.
Till Data includes staff, refund reasons, order and transfer locations, groups, editable departments, PLUs, Addons, Option Items and Option Menus, menu pages and buttons, receipt printers and lines, kitchen printers, and restaurant tables. Add or edit Departments first, then choose one from each PLU's Department list. Staff can be given Compulsory clock in. A PLU's Addons and Option Menus, and an Option Menu's Option Items, use tick-box selectors rather than typed numeric lists. The PLU Available online field controls the hosted menu and defaults to No; Misc Item PLUs are always excluded. Pull From Till replaces the editor with that till's latest uploaded snapshot; Save Changes and Send To Selected Tills are separate actions.
To rename a Menu Page, edit its title and keep its page code unless a new identity is intended. Renaming the title retains its buttons. Dataset edits are not committed online until Save Changes succeeds, so save before refreshing or leaving Settings.
Pull the most recently configured till before editing. A destination applies the complete validated snapshot; do not send an old source over newer local changes.
33
Back Office screen layout editor
After pulling a complete configuration, open Screen Layout.
- Select a page in the Landscape 16 x 10 layout.
- Press Add Button and place the button in a free cell.
- Drag a button to a free grid position.
- Edit caption and type: Product, Addon, Page or Function. Use Create Misc Item to create a named open-price PLU and place its Product button.
- Choose the matching PLU or Addon from the selector. PLUs are sorted by numeric ID; Page and Function types populate their valid target choices automatically.
- For a Product button, optionally set its Selling price and Stock multiplier. Leave Selling price blank to use the PLU price, and leave Stock multiplier blank to move one base stock unit. Decimal multipliers such as 0.5 and 0.25 are retained, without a fixed decimal-place limit.
- Set row/column span, button/text colours and visibility, or delete the selected button.
- To duplicate a group, select the first button, hold Shift while clicking further buttons, then press Copy and Paste. Their relative positions and sizes are preserved and the editor finds the next free area.
- Send the finished configuration to the chosen tills.
The editor checks grid bounds and collisions. This single 16 x 10 layout is used by every updated Android and Windows till, independent of physical screen size.
One PLU with several measures
Use one PLU when several buttons sell different measures from the same stock item. Add two Product buttons, select the same PLU on both, give each its own caption and Selling price, then position them as required. For example, put Pint above Half, or 50ml above 25ml. The PLU remains the shared reporting and stock identity; the button supplies the measure-specific price and caption.
Choose the physical unit used for stock checking as the PLU's base stock unit. For draught counted in pints, set Pint to multiplier 1 and Half to 0.5. Spirit serving buttons retain the 1:2 relationship: set 25ml to 1 and 50ml to 2. For wine counted in 75cl bottles, set Bottle to 1 and a 187ml Glass to 0.25. Direct PLU Stock In, stock adjustments and minimum levels accept decimal quantities without a fixed decimal-place limit.
For a partial-bottle stocktake, enter the measured bottle total rather than rounding it: two full bottles plus one quarter of a bottle is 2.25. Before enabling automatic deduction on a spirit PLU, configure its full-bottle conversion so the bottle count and its 25ml/50ml serving movements use the same unit.
Open or print the Stock Checker Measure Sheet
A sale deducts the selected button's multiplier for each quantity sold. A refund reverses the original sale's multiplier. When a variant is selected on a wastage or stock movement/transfer screen, its multiplier is also applied; direct product-level waste, transfers and adjustments are entered in base stock units.
Screen-button Selling prices do not create separate online products. Hosted ordering continues to use the PLU's normal price, so publish separate online choices only through an online-supported product or option setup.
Measure pricing and decimal stock are an atomic menu feature. If a selected till does not report both MENU_BUTTON_VARIANTS_V1 and DECIMAL_STOCK_V1 when the menu needs them, the deployment stays Pending and no part of that configuration is sent. Its installed menu and data remain untouched until compatible software checks in.
34
Sync and data handling
While Megal EPOS is open and licensed, it checks in with Back Office about every 30 seconds. Sales, refunds, clerk identity, attendance, stock movements, reconciliation sessions and the current configuration are sent in bounded batches. Back Office refreshes visible live data every 15 seconds.
Compatible Android and Windows tills also announce their presence on the local network about every two seconds. A peer disappears from the live roster automatically after roughly ten seconds without a beacon, so a switched-off till does not require a manager to remove it. Tills recognise only the same licensed site identity and Till Group Number, which defaults to 1.
The current LAN service discovers which compatible tills are present; it does not yet copy sales, configuration, stock or open bills directly between them. Operational data continues to use the roughly 30-second Back Office sync. A temporary internet or Back Office outage leaves each till trading from its own local database, but hosted web ordering and cross-till cloud handoff wait for service to return.
Once the server acknowledges a sale, attendance entry or stock movement, the till advances the relevant upload cursor. At the daily poll time, it can remove acknowledged sales from the upload queue; this does not remove the till's operational sale records or its stock audit records. If that scheduled archive handshake fails, it is attempted again on the following day at the same time. When Daily PDF Report Email is enabled, the acknowledged collection also queues one report for the correct trading date; failed mail delivery is retried without interrupting the till.
Queued Back Office settings travel in the reverse direction. A till validates and applies the deployment, then reports success or a failure message for Deployment History.
A temporary Back Office sync failure does not interrupt ordinary till operation. Pending sales, attendance, stock movements and end-of-day reconciliation records remain queued locally. When the connection returns they upload automatically with their original transaction or event dates and times, so delayed records stay in the correct business day and reporting period.
35
Clear Back Office sales data
This action deletes sales held in Back Office only. It does not send a deletion instruction to EPOS tills and does not erase their local sales, receipts, refunds or Z reads.
- Export and securely retain every record the business is required to keep.
- Open Settings > Data Retention and press Clear Sales Data.
- Read the permanent-deletion warning.
- Confirm that required records have been stored safely.
- Type DELETE ALL SALES exactly and press Delete All Sales.
HMRC states that VAT business records generally need to be kept for at least six years. Requirements vary, so confirm the records and retention period that apply to your business before deletion. See HMRC VAT record-keeping guidance.
36
Troubleshooting
SumUp reader shows disconnected
Confirm SumUp payments are enabled and the selected mode matches the reader. On Android SDK mode, use Login to SumUp, Setup / Pair Card Reader and Prepare Reader. For Solo Cloud mode, connect the Solo to Wi-Fi, enter its current pairing code and use Pair Solo Reader on Android or Pair and Save on Windows. Then check the terminal or reader status.
Solo pairing returns 401 Unauthorised
The secret API key or merchant account access is not valid for the request. Re-enter the private API key and Merchant Code from the same SumUp business account. Do not use the public JavaScript key.
A card payment was interrupted
Do not take another or alternative payment. On Android, use Check Pending Payment and inspect the matching transaction in SumUp. On Windows, restore connectivity and press Card again to recover the saved checkout. Finalise only a result that Megal EPOS verifies as successful.
A refund fails
On Android integrated SumUp, check that the original transaction still has refundable value. A SumUp 409 means available account balance is insufficient; resolve it and verify the transaction before one controlled retry. Windows SumUp Cloud currently supports sales only, so use the existing external/manual terminal refund workflow there.
A MAC-address printer cannot be found
Confirm the till and printer are on the same local network, the saved MAC is correct, the printer is awake and client isolation is disabled on the Wi-Fi. Use Find Printer or the connection test.
Kitchen printing fails after a receipt
When both outputs share a printer, make sure Use Receipt Printer Connection is enabled. Megal EPOS queues both jobs; also check that the printer accepts another connection after cutting the receipt.
A till remains offline in Back Office
Open Megal EPOS, confirm internet access and a usable licence, and wait for the next 30-second check-in. Back Office changes the state only after a complete successful sync and marks a missing heartbeat offline after about 75 seconds. Open Till does not intentionally stop syncing. If licensing works but Back Office remains offline, leave the app and its data intact and contact support; pending sales and reconciliation records remain queued for recovery.
Sent settings do not arrive
Check Deployment History. The till must be online, licensed and running to collect a queued deployment. If it reports a validation failure, correct the named field and send a fresh configuration.
The hosted ordering page says ordering is closed
In Back Office > Online Ordering, check that ordering is enabled and not manually paused, the current time is inside a saved period, collection or delivery is enabled, and at least one PLU is Available online. A selected receiver must run a compatible build, have daily reconciliation enabled and open, and have checked in within about 75 seconds.
An accepted online order is not visible on a till
Check Recent online orders for the assigned till and status, then allow one normal 30-second sync cycle. Look in Stored Bills for the external order number; only the one assigned receiver imports and prints it. If a paid order is marked as needing attention, do not recreate it or ask the customer to pay again—retain the provider references and contact support.
A Windows Admin Menu is missing Android payment or printer controls
Check the installed Windows version shown in Back Office. Older builds do not contain every Android-style card-payment, receipt-printer test or Option Menu screen. Continue using only the controls present in that build and install a compatible updated Windows release before relying on the missing workflow.
The licence server cannot be contacted
A paid or VIP licence that was successfully checked online can continue offline until the deadline shown by the licensing screen, normally up to 30 days from that check. Restore internet access and press Retry if needed. The till also detects a successful Back Office reconnection and rechecks the licence automatically.
37
Quick reference
Before trading
- Till has a valid licence
- Open Till and confirm the float when reconciliation is enabled
- Correct clerk is signed on
- Receipt and kitchen tests pass
- SumUp reader shows connected
- Till name and site / branch are correct
- Online Ordering shows Accepting orders when web orders are enabled
At close
- Complete or cancel every open bill
- Run required reports
- Run and confirm the Z Read
- Check Back Office received the day
- Clock out staff and sign off
For account or licensing assistance, contact info@megalsoftware.com.